recode-fa23
Why p5?
p5.js simplifies many complicated Javascript operations into easier, user-friendly building blocks, much like its predecessor Processing did for the Java programming language. Each also used the same metaphor of “drawing on a screen” which appealed more immediately to artists and those who work in visual mediums.
By simplifying many of the complex and esoteric operations, p5.js provides a more intuitive framework which lowers the bar for entry into programming. That is not to say that p5.js is only for beginners, as it is a community project with many hundreds of contributors and users around the world.
For example, here is a side-by-side comparison of how you would draw a circle on the screen in p5.js vs. vanilla javascript:
p5 is the clear winner here in the case of the canvas! But as we have seen in the case of our hand-coding exercises, HTML can be fun to write and a better choice when all you need is a simple informational website.
Vanilla Javascript
Vanilla Javascript is all the built-in or default javascript that all web browsers provide as a baseline without any external libraries added to the mix. And you can do a lot with vanilla js, and indeed all external libraries are abstractions of these base functionalities, i.e. external libraries leverage the capabilities of vanilla javascript and make them much easier, flexible, and efficient to work with, as we saw above in the case of p5.js.
But if all we learned was p5.js, we would be cut off from the wider, open-source world of web development, which was around well before p5.js and continues to grow and expand around it. So let’s talk nuts and bolts about how Javascript fits into the HTML and CSS picture we have painted thus far.
Script tags
To include Javascript in an HTML file, we enclose it in a <script> tag, similar to how we use the <style> tag for CSS. You can also include external Javascript files by adding a src attribute, like so <script src="path/to/file.js" />. This src path can be loaded from a online resource as well, as we will see later when working with external libraries.
Debugging
Javascript is interpreted line by line, so if there is an error in the code, that error will be printed the the browser’s console. You can view this console in Chrome by clicking View > Developer > Developer Tools and navigating to the Console tab, or CMD+OPT+J on a Mac or CTRL+SHFT+J on Windows.
To print something to the console, you simple type console.log('something'). You can print variable, strings or integers like so:
let x = 10
console.log(x)
// outputs 10
…or even multiple lines using a carriage return \n.
console.log('Print\nover\nfour\nlines')
// outputs
Print
over
four
lines
Errors
When you have an error, the browser will usually try to give you a description of the error and point you to where the error occurred in your code and in which document. See an example below with a breakdown:
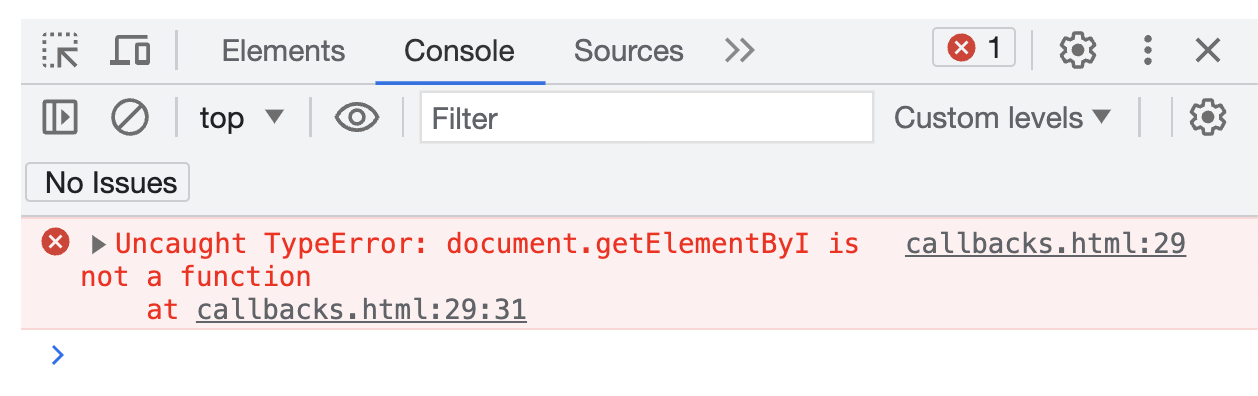
Errors are usually highlighted in red with the following info:
- a description of the error
- this can vary significantly in usefulness, depending on the library or API you’re working with
- the file name where the error originated from
- the line number in the file where the error is
- the character in the line where the error begins
- typically ignored as the line number is helpful enough
Using the DOM
From W3 // https://www.w3schools.com/jsref/dom_obj_document.asp
When HTML is loaded into a web browser, it becomes a document object.

The document object is the root node of the HTML document.

The document object is a property of the window object.

The document object is accessed with:

window.document or just document
The Document Object Model or DOM allows us to access all of the HTML and CSS elements in a web page. The document object has many properties that are accessible to us and can be used straight away. Here is an example of how to assign an element to a variable and change some attribute of that element, using the document object as our access point:
const myImage = document.getElementById('myImage')
myImage.style.width = "400px"
Now, this is assuming we have an HTML element on the page that fits this description, i.e. <img id='myImage' ... />
There are many other ways to access HTML elements via the document object, like by using:
getElementsByClassNamegetElementsByTagName- and many others here…
Events
Up until now, if you have been working exclusively in p5.js, you have mostly relied on a mix of the draw loop, frameCount, logic, and variables to drive events. However, Javascript has many built-in features that allow you to track events that happen asynchronously, so outside of linear time. This can be hard to grasp at first unless we understand the concept of callback functions and events.
There are many event listeners built into the browser by default that occur whether we are listening to them or not. For example, each time the browser finishes loading all of the HTML into the page, the window fires off a “load” event. We can listen to that event like so:
window.addEventListener("load", handleLoad);

function handleLoad() {
  console.log('The window has finished loading!')
}
This type of event-based behavior makes for a very robust experience since the user does not have to follow one set path for interaction.
Callbacks
A function that is passed as an argument to be called at a later date is often referred to as a callback function. handleLoad is an example of a callback used above. The “handleSomething” is a common naming convention. It’s helpful for readability to give your functions descriptive names. Below is an example of assigning a callback to a button click:
const button = document.getElementById('myButton')
button.addEventListener('click', handleButtonClick)

function handleButtonClick() {
  console.log('The button was clicked!')
}
setTimeout
Let’s look at the code we wrote today in class which uses one of Javascript’s many built-in functions, namely setTimeout.
setTimeout first takes two arguments: a function or ‘callback’ and a delay time in milliseconds. The delay time is how long setTimeout will wait until it executes or ‘calls’ the callback function.
setTimeout(callback, delayTime)
setTimeout can function as a recursive or repetitive loop. For example, in the code below, we can write a function called move which calls increments the value of x which controls the placement of an ellipse on the screen. After x is increased, setTimeout is called, which will call the move function again, after the delay time has passed, starting the process all over again. In this manner, we are creating a continuous loop.
let x = 0  // variable we will use to move our ellipse
let delayTime = 200  // in milliseconds

function setup() {
  createCanvas(400, 400);
  move() // first call to our function, starting the loop
}

function draw() {
  background(220);
  ellipse(x, height * 0.5, 20)
}

function move() {
  x += 10; // increment the x value
  setTimeout(move, delayTime) // call move() again after the delay time
}
The
draw()loop in p5 functions in a similar recursive manner, but employs the more robustrequestAnimationFrame()browser API.
The image below shows the code from the MDN documentation for setTimeout which tells us that it takes the following arguments:
- a function reference
- an integer value for the delay time in milliseconds
- … and any additional arguments you wish.
These additional parameters are passed into the function that we supplied as our first argument.

Don’t let the
param1, param2, /* ...,*/ paramNscare you. It just means that you can pass any number of parameters tosetTimeoutthat you want - up toparamNwhereNis just a stand-in for however many you want.
Let’s try passing in additional arguments to setTimeout by rewriting our inc function below. We’ll use the variable a such that the ellipse will move across the screen at ever increasing amounts. I’ll also pass in a longer delay time so you can see the ellipse before it quickly goes off screen.
function inc(a) {
    x += a // increase x by a
    a = x // set a equal to the increased x value
    setTimeout(inc, 200, a) // run inc again after 20 ms and pass in the additional argument a, essentially inc(a)
}
If you ran this code, you’ll notice that you get an error. 👾 That’s because we did not first declare a anywhere in our code. While we could simply say, let a = 20 before we declare our function, but there is a more streamlined way to fix the error.
function inc(a = 5) { // declare a default value for a
    x += a // increase x by a
    a = x // set a equal to the increased x value
    setTimeout(inc, 200, a) // pass a back into inc
}
What’s nice about this code is that it takes advantage of a Javascript shorthand and scope. We give a a value at the time we declare the function and even if we don’t pass an argument to inc, a will still have the default value of 5. You can do this with any additional arguments as long as they are separated by a comma.
Note that
ais not a global variable and has a limited scope that can only be used inside of the functioninc. Programmers often declare variables in this way to keep from “polluting the name space,” which is a programming phrase that describes a situation where variable names could potentially clash with one another within your application or with the built-in browser functions and variables.
🔗 Here’s a great Coding Train video on setTimeout if you want to review!
Anonymous & Arrow Functions
There are a number of Javascript quirks, or syntactical sugar, that you will see as we venture outside of the p5. One is that functions can be written in in various ways for readability and brevity. Programmers are always seeking efficiencies, aka ‘they are lazy.’ And when you’re working with thousands of lines of code, shorthand syntax can be a huge benefit.
Let’s take a look at the code below. All three of these function declarations result in a function called foo that takes one argument bar and prints it to the console. Even though all three have the same result, there is one difference that this syntax introduces which we will discuss below.
For more on why programmers use the ‘foo’ and ‘bar’ conventions, read this Wiki.
// 1. Standard function declaration
function foo(bar) {
    console.log(bar)
}

// 2. Declare a variable using an anonymous function
const foo = function (bar) {
    console.log(bar)
}

// 2. Declare a variable using an anonymous function with arrow syntax
const foo = bar => console.log(bar)
Note: Instead of p5’s print( ) function, we will use console.log( ). This will be important as we get outside of p5, but console.log will also print to the p5 web editor’s console.
Number 1. is what you’re used to seeing. When a function is declared this way, the function will be called up or ‘hoisted’ when your code is compiled. This means that it’s available to use from the start of your code. So you could call the function foo() on line 1 of your code even before you declare it many lines later.
Number 2. assigns a so-called anonymous function to the variable foo. A function is anonymous when it is not assigned a name after the function declaration. As such, this function is not ‘called-up’ and you can only use it after you have declared it. Here is a p5 sketch that demonstrates this behavior.
Number 3. also uses an anonymous function but drops the word function altogether. Also, you’ll notice that there are no parenthesis around the argument bar. Since we are only passing 1 argument, we can exclude them.
Furthermore, Number 3. employs ‘arrow function’ notation which is denoted with an equals sign = and the greater-than > symbol, like so =>. Think of the arrow as taking the place of the word function. The arrow is also illustrative of the fact that the argument is ‘passed into’ the function.
You won’t use arrow notation
=>anywhere else in Javascript except when dealing with functions.
And finally for Number 3., we don’t need to encapsulate it with brackets { ... } since we are only writing one line of code after the arrow. This same behavior is seen in a shorthand if statement, like so if(bar == true) console.log(bar).
Programmers use arrow syntax and anonymous functions quite often, so it’s best to get familiar with it. However, I don’t recommend that you rewrite any of the built-in p5 functions this way, as it can cause errors. Think of p5.js as a walled garden in which there are many beautiful things, but introducing outside code can threaten the ecosystem.
Var, Let, Const - which do I use???
tl;dr - use let instead of var in almost every case, and use const if you know the value you are using is not going to change (arrays and objects are considered constant if their contents simply modified).
As I pointed out above, Javascript is always changing and evolving as it is one of the most widely used programming language in the world and is being developed by many millions of programmers. You’ll see some of the major corporate players, like Google, Facebook, or Microsoft, spearhead initiatives to codify a new syntactical practice, and they will work closely with non-profit foundations to propose and preside over new updates, with care not to break the code that came before it. It’s a very tough task with many moving parts, to say the least. And what’s more, programmers are very opinionated!
ECMAScript 2015 was the name of the last major Javascript update which happened, you guessed it, in 2015. It’s generally referred to as ‘ES6’. This update introduced a number of significant changes, like arrow functions, which we discussed above, and new ways to declare variables.
The old way, you simply declared a variable with var. ES6 introduced new declarations let and const. For our purposes, the differences between var and let are less significant and you’ll see a mixture of these still in use.
const however is quite different. Once you declare a variable with const, you cannot reassign it’s value. See the example below:
const foo = 5
foo = 6
// will throw an error

const bar = function () {
  console.log(foo)
}
bar = "new information"
// will throw an error

const bar = []
bar[1] = 7
// this is fine since we are not re-assigning bar
// we are only manipulating the contents of the existing array

const bar = {}
bar.info = "new information"
// also fine since we are only manipulating the contents of the object
// not eliminating the object and reassigning the value of bar
For more info and examples, check out this Free Code Academy link.